on
Setup your Python development environment
TLDR; Install the Anaconda distribution, open up Spyder or a Jupyter Notebook, and read the very helpful documentation to get started writing Python.
~~~
By now, you’re probably dreaming of coding the next blockchain app. Upon sitting down to crank out several thousand lines beautiful code you think “what the…I actually have no idea where or how to start writing and running code.”
Or maybe you’ve done some research and realized just how many different options are out there. What’s the right way to go? Don’t worry, there is no “right answer.” However, the path I have outlined below is what I believe is the most straightforward approach to getting started.
This article is intended for those who are just getting started with Python. The goal is to give you enough information to get a Python development environment set up and learn the basics of using it.
Before diving in, it can be helpful to familiarize yourself with Python syntax and general programming concepts. Resources like w3schools, Codecademy, and Google, are worth checking out. If you’ve already done some research and are ready to start coding, then read on…
Some operating systems come with a version of Python installed, but the go-to, highly recommended starting point is to install the Anaconda distribution.
The Anaconda distribution includes Spyder and Jupyter Notebook to write and run Python code and all the most commonly used data science packages. Anaconda also includes tools for installing new packages quickly and easily, automatically managing dependencies between packages, creating multiple development environments, and much more. It’s great, install it now!
Now, what development environment to use? I prefer Spyder because it is data-oriented (vs. software or web development, for example) and just gets the job done without unecessary complexity. There are a ton of other options out there, you can search ‘python ide’ to see. At the end of the day, choosing a development environment mostly comes down to personal preference and the type of work you’ll be doing. Some notable options include Pycharm and Atom.
Although this article won’t cover Jupyter Notebook in detail, it’s worth highlighting because it is included with Anaconda. In a nutshell, Jupyter notebook is a development environment that runs in your web browser. It’s strength comes from features that allow you to mix code and rich-text in order to create great-looking, shareable documents in whatever format your audience needs (Markdown, HTML, PDF, etc.). It can be a nice tool to supplement a pure Python IDE.
Spyder Overview
Assuming you have installed Anaconda successfully, you can open up Sypder from Anaconda Navigator or by typing ‘spyder’ in a terminal window. When it opens, you should see something similar to the image below.
-
The code editing window - this is where you’ll write your code. To run code, select the lines you want to run and press the key has been assigned to the ‘Run Selection’ command. To see what key (or key combination) has been assigned, you can go to ‘Preferences’ within Spyder. As an alternative to selecting the lines of code you want run, you can separate your code into chunks called cells using the characters ‘#%%’. When the ‘Run Cell’ command is used, the code in the cell that your cursor is currently in will be executed.
-
Variable Explorer - IMO, this is one of the most useful features of Spyder. In this window, you can see the values of each variable, the variable type (e.g., integer, string, DataFrame), and other useful information such as the size (i.e., number of elements). Double-clicking a variable in the Variable Explorer will open up a separate window for closer inspection of that variable. You can also edit variables directly by clicking on the ‘Value’ portion of the object listed.
-
Ipython console - this is your window into the Python interpreter which is the program that reads and runs your code behind the scenes. The console serves as an indicator to tell you if your code ran successfully or if there are errors that prevent the code from executing successfully. The console is interactive too, which means that you can type in the console to execute certain commands and interact with the code you have written.
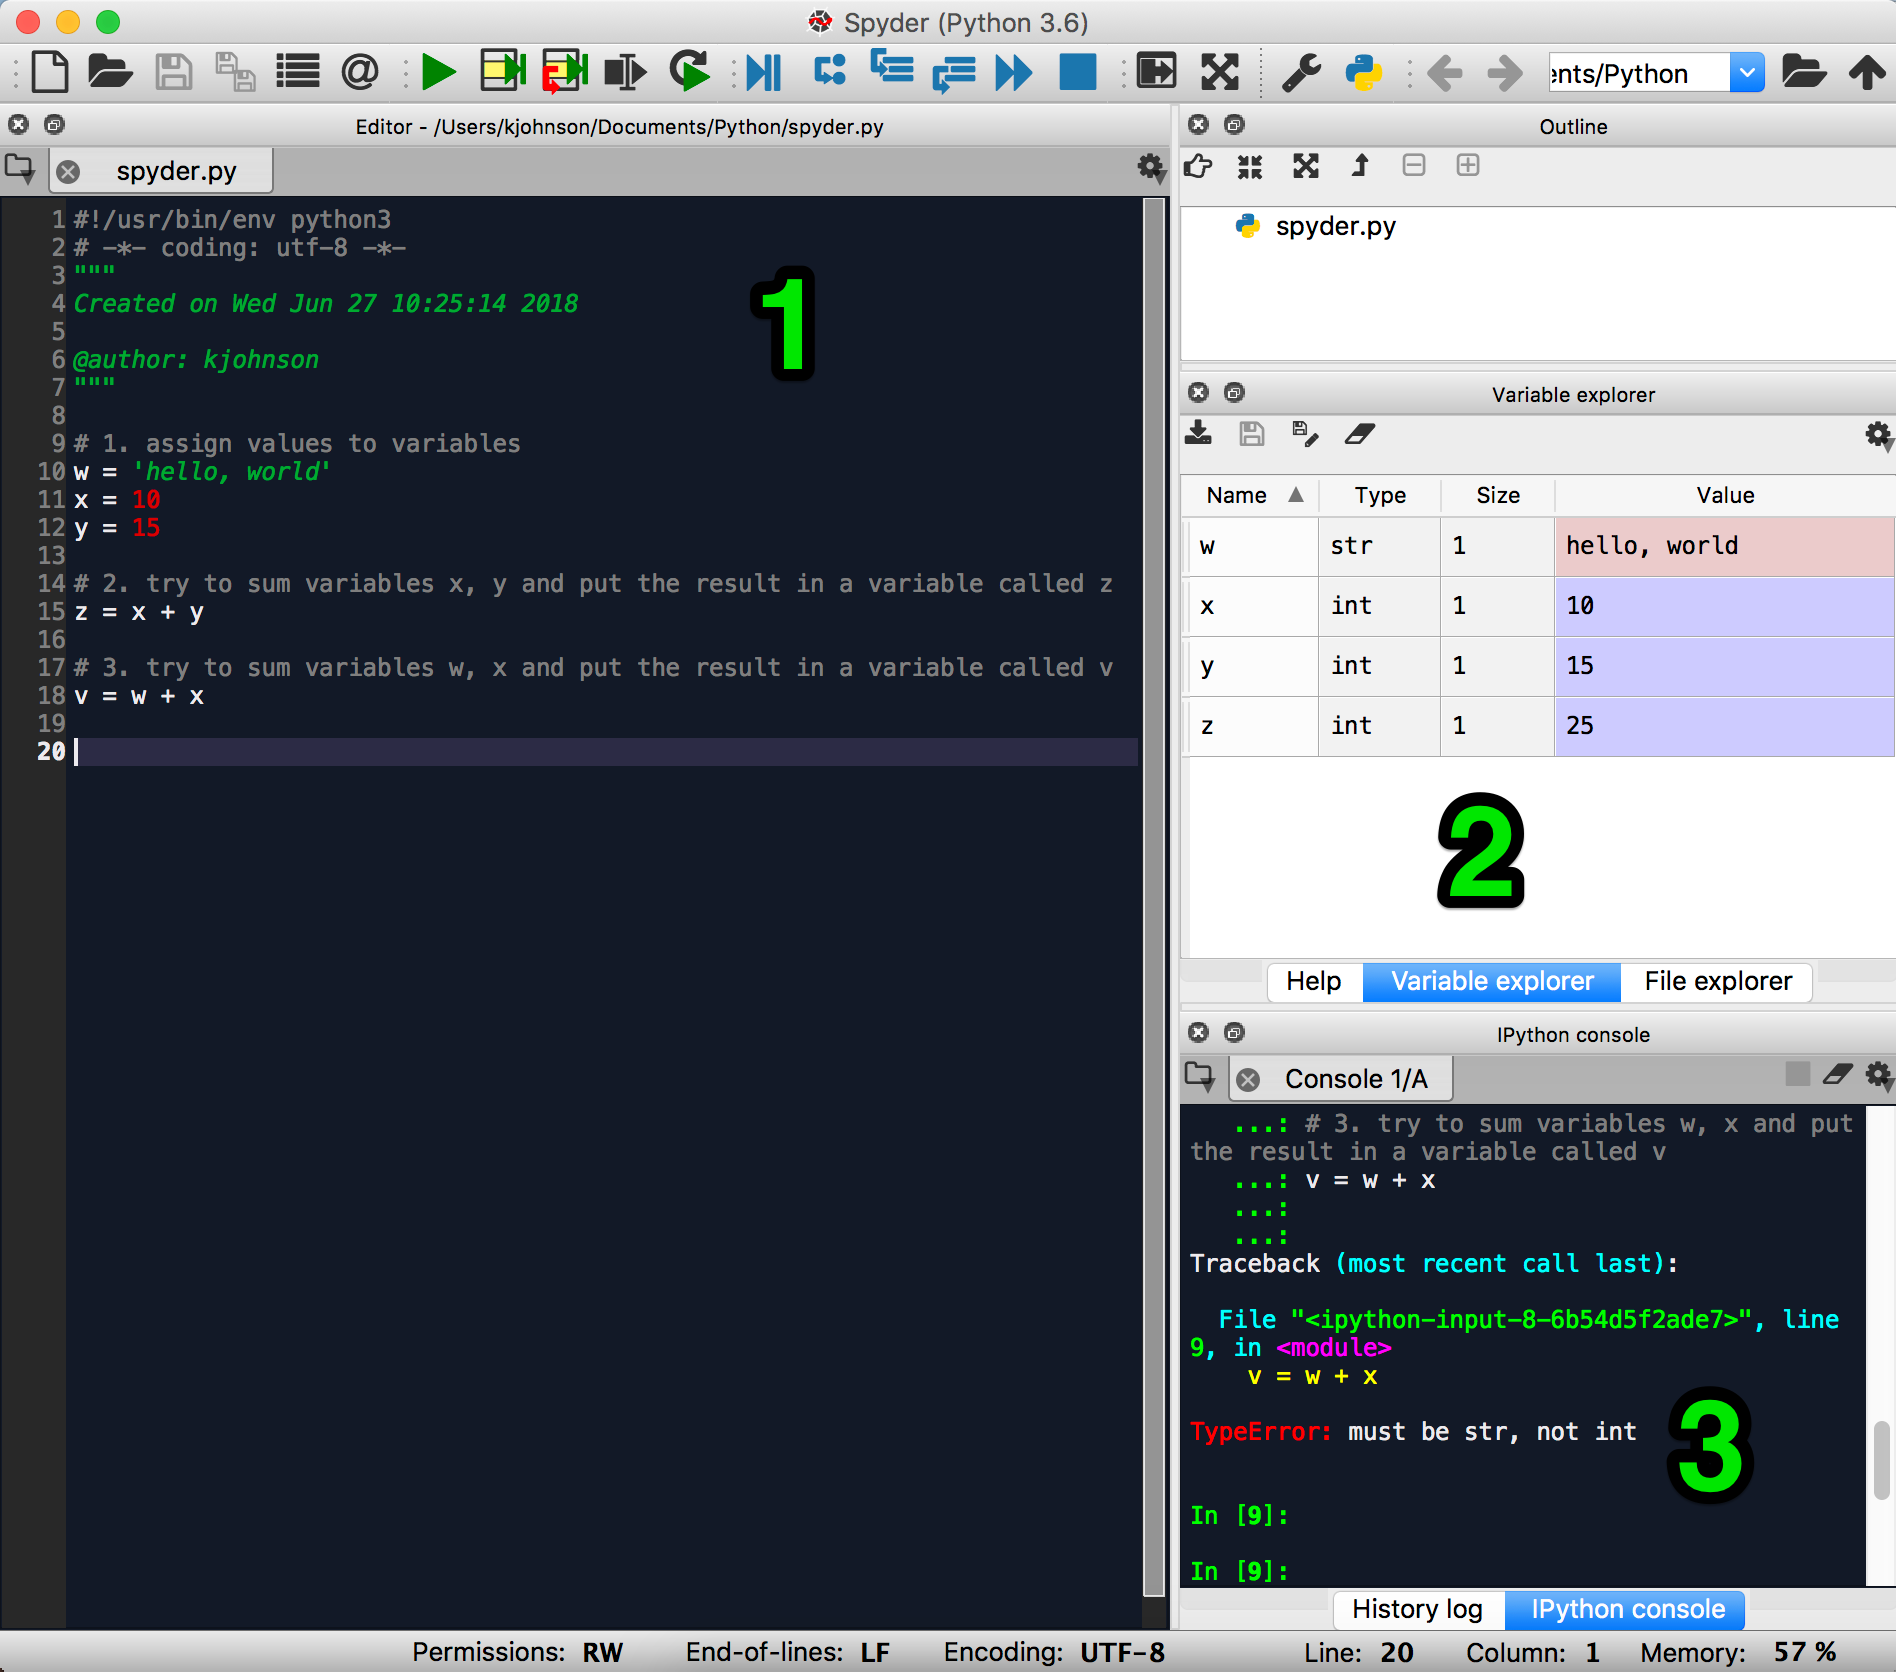
Let’s write some code to demonstrate how this all works. Write the code below in the code editing window:
# 1. assign values to variables
w = 'hello, world'
x = 10
y = 15

# 2. try to sum variables x, y and put the result in a variable called z
z = x + y

# 3. try to sum variables w, x and put the result in a variable called v
v = w + x
Section 1 creates three variables and assigns them values. Section 2 creates a fourth variable, z, and assigns it the sum of variables x and y.
Run the code in section 1 and 2 (select the code and execute the ‘run selection’ command). Observe the Ipython Console. Not much information is displayed (which in this case is good). If the code had contained an error, the error message would be displayed in the console.
Now observe the Variable Explorer window. You can see that by executing the code we have created four variables (w, x, y, z) and assigned them each a value. You can also see that the code in section 2 took the sum the variables x and y, and assigned the result, ‘25’, to variable z.
Last, try running section 3. You’ll notice that an error is displayed in the console because you can’t find the sum of a string (hello, world) and a number (10). As you’re writing code, continuously running small sections and keeping an eye on the output shown in the console will save you time and effort compared to debugging everything in one big batch.
If you’re just getting started, the components of the Anaconda distribution that you’ll use that most frequently are Conda (the package and environment management system) and one of the included development environments (Spyder, Jupyter Notebook). Environments allow you to create specific conditions for projects and to isolate those conditions from other projects. Packages are “add-ons” that expand the capabilities of Python, e.g., data visualization, file input/output, machine learning, etc.
In the beginning, you won’t need to worry about adding new packages or managing multiple environments, however, inevitably, you’ll run into a case where it will be needed. I recommend reading through the Conda documentation after getting to the end of this article to get familiar with these concepts.
And that’s about it. You can check out the Spyder documentation and peruse the preferences within the application to learn more.
Good luck!